The Egyptian
Western Desert,
November 1915 to February 1916
Introduction
In
1914, the 15th Ludhiana Sikhs went to fight in France
with the 3rd Lahore Division, but in late 1915 the Regiment was posted to Egypt where it
operated against a much more traditional and tribal enemy.
Working
from eastern Libya,
Sayed Ahmed, known as the Senussi, was the leader of a sect of devout
Muslims. His men had been fighting the Italian occupiers of Libya with
considerable success. They were trained and assisted by a group of Turkish
military officers led by Nuri Bey, half-brother of the Turkish War Minister,
Enver Pasha. During 1915 German submarines began supporting the Turkish
effort with the Senussi’s army by transporting Turks and weapons to Eastern Libya and attacking shipping along the Egyptian
coast. The Senussi was at first reluctant to fight Britain, but in the end Nuri Bey persuaded him
to join the Turkish Holy War and to invade Egypt. The Allied reverses at
Gallipoli doubtless influenced the Senussi’s thoughts and actions.
In
early November 1915, a German submarine sank the British ships Tara and Moorina
off the western Egyptian coast, and the British survivors of these attacks were
handed over by the submarine to the Senussi who arranged their captivity. The
Senussi’s troops then harassed and fired upon the British outposts at Sollum and
Sidi el Barrani. British Headquarters in Cairo decided that a withdrawal was
necessary, and all British troops west of Matruh were ordered to move to that
location. At Sollum, the most westerly British post, the withdrawal was
effected rather too hastily, as the Egyptian Army garrison of the fort was left
behind. During the withdrawal, many Egyptian Coastguards deserted to the
Senussi with their weapons and camels. The Senussi’s followers now occupied and
pillaged all the abandoned British locations.
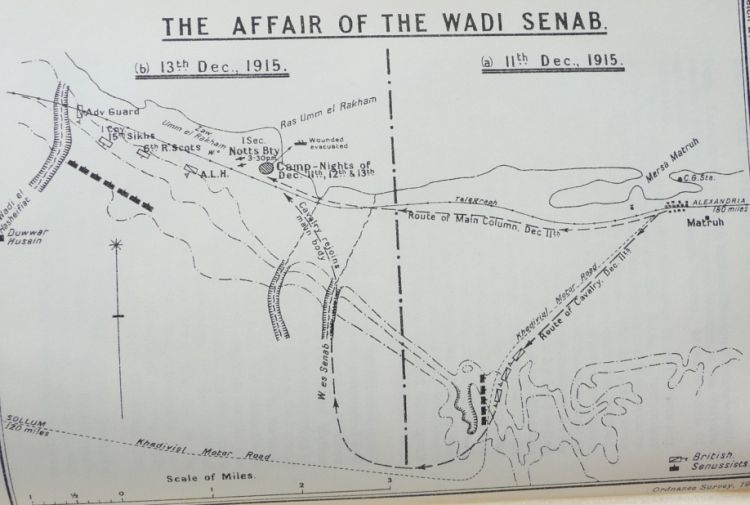
The first action at Wadi Senab
On
the 20th November 1915, the British formed the Western Frontier Force (WFF).
The commander was Major-General A. Wallace and he assembled his force at
Matruh. A light railway moved the men and mounts from Alexandria to Dabaa, and from there the men
marched or were shipped the seventy-five miles to Matruh.
The
WFF contained an infantry brigade composed of three partially-trained British
battalions, the 6th Royal Scots and the 2/7th and 2/8th Middlesex, plus the
15th Sikhs. The other main component of the WFF was the cavalry brigade
consisting of three composite British Yeomanry regiments and a composite
regiment of Australian Light Horse. Brigadier-General the Earl of Lucan
commanded the infantry, and Brigadier-General J.D.T. Tyndale-Biscoe commanded
the cavalry. The 15th Sikhs was the only regular major unit. The
one artillery battery, the Notts Battery Royal Horse Artillery, was to perform
very well in the forthcoming actions.
By
the 3rd December the British garrison at Matruh numbered 1,400 men. New
arrivals included ‘A’ Battery. Honourable
Artillery Company, two 4-inch guns manned by Royal Marines, two aircraft of the
17th Squadron, Royal Flying Corps, and a six-car detachment from the Royal
Naval Armoured Car Division. Meanwhile, over 2,000 of the Senussi’s men
were believed to be moving south and west of Matruh.
On
the 11th December, General Wallace sent out a column to disperse a group of
enemy reported to be at Duwwar Hussein, sixteen miles west of Matruh.
Lieutenant-Colonel J.L.R. Gordon, 15th Sikhs, was appointed Column
Commander. The column consisted of the 15th Sikhs, less two companies,
the 2nd Composite Yeomanry Regiment, a section of guns of the Notts Battery and
a detachment of armoured cars. Lieutenant-Colonel Gordon took his
infantry along a track that followed the telegraph line westwards to Sollum,
while the cavalry, guns and armoured cars used a road to the south-west, known
as the Khedivial Motor Road,
which also led to Sollum.
Left: Men believed to be the Senussi's followers captured by British Yeomanry
The
mounted column departed at 07.00 hrs on 11th December, but the cavalry moved so
quickly that the scouts could not keep sufficiently ahead of the main
body. Around 300 enemy were waiting to the north of the road in the Wadi
(valley) Senab, and they successfully ambushed the cavalry. Attempts made
to turn the enemy’s right flank were driven back by heavy fire, and a stalemate
existed until a squadron of Australian Light Horse arrived from Matruh in the
afternoon. Then, using artillery support, the cavalry forced the enemy
group out of its position. Eighty dead and seven prisoners were left
behind by the Senussi troops. British losses were sixteen killed and
seventeen wounded. During this action Lieutenant-Colonel Gordon continued
along his track and established a firm base at the Umm Er Rakham wells.
The cavalry joined him here during the night.
As
the cavalry mounts were now exhausted, the 12th December was spent in resting
and in rounding up nearby enemy stock. The 6th Royal Scots, less two
companies, joined Gordon during the night of the 12th, as did a convoy of
stores. On the following morning at 08.30 hrs, Gordon marched west to
Wadi Hasheifat planning to turn south up the wadi towards Duwwar Hussein.
As the track was expected to be unfit for heavy wheels, the sixty 1st Line
Transport pack mules of the 15th Sikhs were loaded with reserve ammunition and
extra water for the column. One company of the 15th Sikhs was left to
guard the camp.
As
the British column approached the Wadi Hasheifat from the east, the cavalry was
forward and dispersed, No. 2 Company of the 15th Sikhs was the advanced guard,
and two platoons of the Royal Scots formed the left flank guard.
Lieutenant-Colonel Gordon heard heavy firing on his left and observed his left
flank guard running very swiftly towards the shore, pursued by an equal number
of uniformed and well-drilled soldiers who used formations and cover as they
followed up the fleeing Royal Scots. The British soldiers were making no
attempt to engage the enemy, who were troops of the Muhafizia, the Senussi’s
regular army trained by the Turks. The Sikhs’ two machine guns came into
action to halt the enemy advance.
Right: Muhafizia troops (a post-Great War photo).
Many more of the enemy now
appeared and Lieutenant-Colonel Gordon decided to fight on the edge of the plateau
that rose from the coastal plain. The Royal Scots were ordered to move
forward and to the left, and the cavalry were brought back to man the right of
the line; however the cavalry took some time to reorganize, and the Royal Scots
appeared unwilling to advance. This left the advanced guard, which had
occupied some mounds, in an exposed position and Gordon ordered it to withdraw
towards the headquarters. The 15th Sikhs’ company commander, Captain
C.F.W. Hughes, replied that he could not comply with the order unless he
abandoned his wounded, and that he was therefore obliged to hold his
ground. The enemy increased the pressure around 10.00 hrs by bringing
4-inch guns into action and by effectively deploying machine guns.
Lieutenant-Colonel
Gordon radioed back to the camp at Umm Rakham ordering forward all
reinforcements that could be spared, and the machine gun section of the Royal
Scots and seventy-five men of the Australian Service Corps, armed with rifles,
were sent forward. As these reinforcements approached the main body, an enemy
machine gun engaged them. This induced the Royal Scots machine gun
section to break and run for cover with their guns into the sand dunes on the
beach, but the Australians stayed and fought well. Finally two squadrons
of Australian Light Horse came forward from Matruh and escorted two Royal Horse
Artillery field guns onto the beach where they engaged the Senussi’s
warriors. Also HMS Clematis, a newly-built submarine trawler
mounting two 4-inch guns, appeared offshore and fired at the enemy
positions. A lucky British shell exploded amongst one of the largest
groups of enemy, scattering it, and that was the turning-point of the
action. The enemy began to withdraw, and as his machine guns ceased
firing the Royal Scots advanced to their nominated objective. The 15th
Sikhs advanced guard regrouped and evacuated its four dead and nineteen
wounded.
Knowing he could not achieve a
decisive result and aware of the fatigue felt by men and mounts, Lieut.-Colonel
Gordon withdrew his men to their camp and on the next day the column returned
to Matruh. British casualties amounted to nine killed and fifty-six
wounded whilst enemy casualties were around 100 killed and wounded. The
Official History comments:
‘The enemy had been driven off,
but had been able to retire unmolested, and must be given credit for the
surprise and the vigour of his attack. Had the standard of training and
the experience of the whole column been equal to those of the 15th Sikhs, the
Senussi might have been heavily defeated.’
The action around the Wadi
Majid
Bad
weather now prevented operations for ten days and during this time the 1st Battalion, New
Zealand Rifle Brigade arrived to join the
WFF. Meanwhile British aerial reconnaissance reported that the enemy was
concentrating 900 Muhafizia in three battalions, plus four mountain guns and
two machine guns, six miles south-west of Matruh where Jebel (mountain) Medwa
dominated the road to Sollum. General Wallace hoped to surprise the enemy
force, and at 05.00 hrs on 25th December two columns moved out from Matruh.
The
southern composite cavalry column under Brigadier Tyndale-Biscoe detoured on a
southern loop through Wadi Toweiwa, attempting to position itself to prevent an
enemy withdrawal. The infantry column, comprising the 15th Sikhs, 1st
N.Z. Rifle Brigade and 2/8th Middlesex, plus supporting arms, advanced down the
Sollum road. General Wallace’s headquarters followed the infantry column. The
only effective signaling sub-unit in the force was the 15th Sikhs signals
platoon. Lieut.-Colonel Gordon, who had asked to command his battalion
rather than do a job that General Wallace could easily manage, was ordered to
command the infantry column. Major G. Pennefather-Evans commanded the 15th
Sikhs. As dawn broke, an enemy outpost spotted the British advance and
gave the alarm by lighting a huge bonfire.
Observing
that Jebel Medwa was not occupied, Gordon sent one of the two 15th Sikh
companies forming the advanced guard to seize the Jebel, and this was achieved
without opposition. At around 08.00 hrs an enemy mountain gun began to
shell the road from a ridge west of Jebel Medwa where the enemy battalions were
forming up. This caused the 15th Sikhs to open out into artillery (i.e.
dispersed) formation, astride of but well clear of the road. With
Lieut.-Colonel Gordon using his telescope and acting as an observer, the Notts
Battery engaged and silenced the enemy gun from a range of 2,000 yards, whilst
shells from HMS Clematis also fell on the enemy-occupied ridge from a
range of 10,000 yards.
Lieut-Colonel
Gordon requested General Wallace to relieve the Sikh company on Jebel Medwa,
and a company of the Middlesex did this. The 15th Sikhs now advanced on
the enemy ridge on a frontage of 200 yards, with the 1st New Zealand Rifles
following. Companies of New Zealanders were placed as guards on each
flank as the Sikhs moved briskly across an open plateau. The advance was
halted 800 yards from the enemy to allow the cavalry to appear and take up
position. As the cavalry did not appear, the advance continued but now with
both New Zealand
companies on the right flank. As the British troops moved onto the ridge
the enemy broke and fled, some of them hiding in caves and gullies where they
were shot or bayoneted. The whole of the ridge was secured by 10.00
hrs. Gordon now brought the guns forward onto the plateau where they
fired into the retreating enemy. Regrettably the cavalry was not in
position to complete the destruction of the Muhafizia battalions.
The
southern column had first been delayed by moving its guns over difficult
terrain, and then had been engaged at around 08.00 hours by enemy camelry and
horsed cavalry who had anticipated the British cavalry move. Although machine
gun fire finally dispersed the enemy, this contact disrupted the column’s
advance. At 15.00 hrs the cavalry column appeared but by then the battle
was nearly over. The enemy had retreated into Wadi Majid followed by the Sikhs
and New Zealanders. The enemy camp in the wadi was set alight and the
Muhafizia rearguard, demoralized but still fighting effectively, was driven
onto the beach. Some of the enemy feigned death or wounds, but then
opened fire at close range. This so enraged the Sikhs that any of these
men taken alive were thrown into the burning tents.
Left: A German World War 1 postcard depicting a British defeat.
The
light was fading and at 17.00 hrs Colonel Gordon broke off the infantry
pursuit, ordering the battalions to bivouac on Jebel Medwa. The mounted
troops returned to Matruh that night, followed by the infantry early the next
morning, 26th December. British losses had been thirteen killed and
fifty-one wounded. The Senussi’s force lost between 300 and 400 dead, and
eighty prisoners were taken.
The action at Halazin.
The
15th Sikhs were now involved in two minor operations as a result of aerial
observation of enemy encampments. On the 28th December a column
marched out to Bir Gerawla, twelve miles south-east of Matruh, and on 12th
January 1916 another column marched to Jebel Howeimil, thirty-five miles
in a similar direction and fifteen miles south of the coast at Baqqush.
In both cases the camps were found to be deserted and were burned down.
Live-stock in the immediate vicinities was seized.
On
19th January an aeroplane located the main enemy camp at Halazin, twenty-two
miles south-west of Matruh. Over 300 tents were observed, one of them
belonging to the Senussi himself. General Wallace left Matruh at 04.00
hrs on 22nd January with an infantry and a mounted column. A South African
battalion now joined the WFF. The right-hand infantry column was
commanded by Lieut.-Colonel Gordon and the left-hand mounted column by
Brigadier Tyndale-Biscoe. The force bivouacked in bad weather at Bir
Shola, just over half way to Halazin. On the 23rd, Gordon’s column advanced
on a compass bearing directly towards the enemy whilst the mounted column
echeloned to the left front of the infantry. Motor transport experienced
extreme difficulty on the sodden ground, and the armoured cars returned to
Matruh.
By
09.25 hrs the cavalry were in action against parties of the Senussi’s men and
Brigadier Biscoe requested the infantry to attack whilst the cavalry manoevred
against the enemy’s right flank. At 10.00 hrs the 15th Sikhs advanced
with No. 1 Company leading, No. 2 Company 200 yards behind, and No. 3 and No. 4
Company 300 yards further to the rear. Each company echeloned its
platoons to the left. Support was provided by the 2nd South African
Infantry, the 1st New
Zealand rifles and the covering fire of four
guns of the Notts Battery. The enemy displayed considerable skill in
withdrawing to prepared defences and made good use of mountain guns and machine
guns, causing attrition amongst the British troops. Seeing that his right
flank was being aggressively turned by parties of the enemy, Gordon reinforced
that flank, first with two companies of South Africans, then with a company of
New Zealanders with machine guns, and finally by a company of Royal Scots.
Meanwhile,
on the British force’s left flank the cavalry was also outflanked and receiving
effective enemy machine gun and artillery fire. Despite receiving reserves, the
mounted troops were gradually driven in. Two companies of New Zealanders
were sent to stabilize the left flank, which they did, and the remaining New Zealand
company advanced on the left of the Sikhs. The shape of the British
advance now resembled a horse shoe with the Sikhs in the centre of the
curve. The British infantry did not flinch, despite the open ground it
crossed and the punishment it took. By 14.45 hrs the Sikhs, New Zealanders and
South Africans were through the enemy camp and into the entrenchments.
The
enemy defenders broke and retreated into the desert, abandoning their
position. The British cavalry mounts needed water and were not in a condition
to pursue, so again the Senussi’s men escaped. The British had lost one
British officer and twenty men killed, ten British and three Indian officers
and 278 other ranks wounded. The 15th Sikhs suffered eighteen men killed
and two British and three Indian officers and 115 men wounded. The
Senussi escaped, but he had lost around 200 men killed, including Turkish
troops, and up to 500 wounded. General Wallace camped two miles to the
east, and the non-walking or riding wounded had to be carried through the wet
ground on stretchers. The British force took two days to complete its
withdrawal to Matruh.
Jemadar
Basant Singh, 15th Sikhs, received the Indian Order of Merit for gallantry at
Halazin, the only I.O.M. granted for this action. In addition, eight other
ranks of the 15th Sikhs were awarded the Indian Distinguished Service Medal.
These awards were promulgated in GO 1531 of 14th September 1917.
Conclusion.
The Senussi and his followers continued to present a security threat in the Western Desert for a further twelve
months. But the participation of the 15th Sikhs in the campaign was over,
as the regiment now received orders to proceed to India. The 15th Sikhs had
borne the brunt of the fighting so far, and had provided the backbone for a
very untrained, inexperienced and under-staffed Western Frontier Force.
The regiment had acquitted itself with distinction, and for its services in
this theatre it received the honour ‘Egypt 1915-17.’ As a result of the
post-war reforms of the Indian Army, it became the 2nd Battalion, 11th Sikh
Regiment.
___________
Sources Russell McGuirk, The Sanusi’s
Little War; The 15th Sikhs War Diary (copy kindly provided by
Russell McGuirk); Lieut.-General Sir George Macmunn & Captain Cyril Falls,
Official History of the War, Military Operations Egypt and Palestine, from the
outbreak of war with Germany to June 1917; Field Marshall Lord Carver, The
National Army Museum Book of the Turkish Front 1914-18; Peter Duckers,
Reward of Valor, The Indian Order of Merit 1914-1918; Rana Chhina, The
Indian Distinguished Service Medal.
(This
article appeared in a recent edition of Durbar, the Journal of the
Indian Military Historical Society.)
For the complete selection of maps relating to this article please click HERE

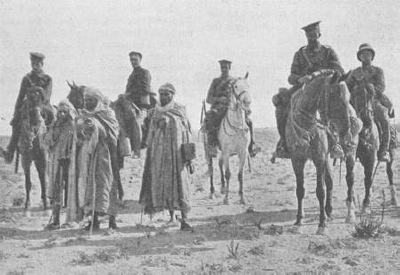 Left: Men believed to be the Senussi's followers captured by British Yeomanry
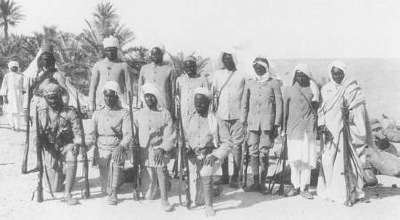 Right: Muhafizia troops (a post-Great War photo).
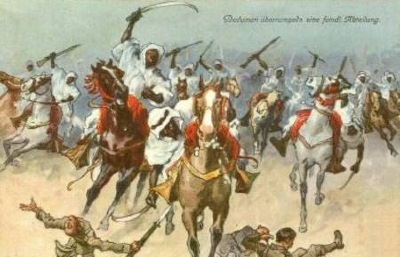 Left: A German World War 1 postcard depicting a British defeat.