On the right flank No 5 MI Company
and the Gadabursi Horse had dismounted and approached the enemy too closely;
the dervishes rushed them, causing confusion and dispersing the Gadabursi
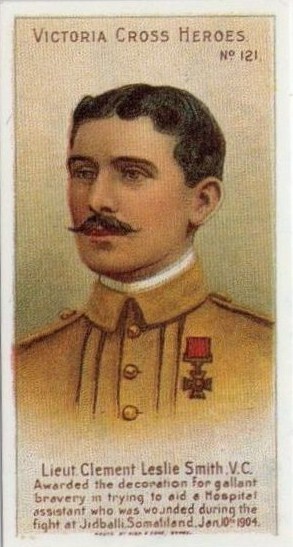
Horse, whose mounts, along with those of No 5 MI Company, bolted. During this action Lieutenant Clement Leslie
Smith, Duke of Cornwall’s Light Infantry and No 5 (Somali) Mounted Infantry
Company, displayed gallantry that earned him a Victoria Cross with this citation:
At the commencement of the fight at Jidballi, on 10th
January, 1904, the enemy made a very sudden and determined rush on the 5th
Somali Mounted Infantry, from under cover of bushes close at hand. They weresupported by rifle fire, advanced very rapidly and got
right amongst our men. Lieutenant Smith, Somali Mounted Infantry,and
Lieutenant J. K. Welland, M.D., Royal Army Medical Corps, went out to the aid
of Hospital Assistant Rahamat Ali, who was wounded, and endeavoured to bring
him out of action on a horse, but the rapidity of the enemy's advance rendered
this impossible, and the Hospital Assistant was killed. Lieutenant Smith then
did all that any man could do to bring out Doctor Welland, helping him to mount
a horse, and, when that was shot, a mule. This also was hit, and Doctor Welland
was speared by the enemy. Lieutenant
Smith stood by Doctor Welland to the end, and when that Officer was killed, was
within a few paces of him, endeavouring to keep off the enemy with his
revolver. At that time the dervishes appeared to be all round him, and it was
marvellous that he escaped with his life.
The
dervishes attacking the square attempted to charge the left face and then the
front and right faces, but both charges were stopped in their tracks by rifle
fire and by very effective Maxim gun fire from the corners of the square. Armourer Sergeant A. Gibb, firing from the
right front corner, was seen to drop nine dervishes with one burst of
fire. This defensive fire kept the
attackers at a distance of 350 metres from the square. After 20 minutes of fighting the dervish
resolve suddenly broke and a rapid retreat began which turned into a rout. The Mounted Infantry companies were ordered
to pursue. The two British guns engaged
the fleeing enemy up to a range of 2,000 metres when fire was checked to avoid
hitting the MI.
The
British mounted companies pursued the enemy for 30 kilometres, shooting down
all that they caught up with, until lack of ammunition and exhaustion of mounts
led to Kenna halting his men and returning to the infantry. The body count around the square was 668 dead
dervishes and it was estimated that Kenna’s men had shot down a greater
number. The dervish strength before the
battle was believed to number up to 8,000 men.
Apart from
Lieutenant J.R. Welland, Royal Army Medical Corps, two other British officers
were killed during the action:
-Lieutenant
C.H. Bowden-Smith, Hampshire Regiment, was killed during the fighting. -The
Remount commander, Captain Honourable T. Lister, 10th Hussars, was employed as
Kenna’s Orderly Officer during the action and he was reported missing whilst
delivering a message; his dead body was recovered the following day.
Seven British officers were
severely wounded:
-Major F.B. Young, Cheshire
Regiment, commanding 2nd KAR; -Brevet-Major G.T.M.
Bridges, RA, commanding the
Tribal Horse; -Captain G.C. Shakerley, KRRC,
commanding No I Corps MI; -Captain E.H. Llewellyn, Royal
Inniskilling Fusiliers, Adjutant of 2nd KAR; Lieutenant H.H.R.
White, KRRC, Adjutant of No I Corps MI; -Lieutenant H.E. Reinhold, 27th
Punjabis; -Lieutenant A.E. Andrews, Hampshire
Regiment.
Two other officers were slightly
wounded:
-Lieutenant Colonel G.T.
Forestier-Walker, RA, AQMG-I; -Captain G.R. Breading,
Worcestershire Regiment, commanding the company of the 3rd KAR.
Six Indian soldiers (including one
gunner), 10 Somali Levies and 1 Indian Follower were killed. Five British rank and file, 2 Indian
officers, 13 Indian and African rank and file, 7 Somali Levies and 2 Followers
were wounded. Egerton’s order to the
square to fire from the prone or kneeling positions had saved many infantrymen
and sappers from death or wounds. After
the battle Egerton bivouacked his force at a well 3 kilometres beyond
Jidballi. The Sappers & Miners were
tasked with clearing the Jidballi wells that were now clogged with dead
dervishes, their beasts and battlefield refuse.
Above: Indian Camel Transport
Post-Jidballi
land operations Egerton’s force, tied to its
slow-moving supply chain, could not now get ahead of the Mullah who moved his
followers and their herds northwards from the eastern Nogal through the Anane Pass
towards Jidali, south of Las Khorai on the coast of the Protectorate. Manning’s brigade sealed off routes to the
south, exhausting itself in the process as the climate was at its hottest. British camel losses seriously increased
during this dry, hot phase.
Fasken’s brigade followed the
Mullah and on 19th March came across a dervish raiding party from
which it captured 1,200 sheep. The
mutton was a welcome addition to the troops’ rations; supply convoys could not
move fast enough to keep up with the brigade, and officers were shooting game
for the pot. The raiders fled from
Fasken right into the hands of Shakerley’s No 1 (British) MI Company and
Beresford’s Tribal Horse (except for 100 mounted men the Gadabursi Horse had
been disbanded since its disintegration at Jidballi). With the loss of only one mount the British
and Somali horsemen killed 53 dervishes and captured 4 prisoners, 27 camels, 23
rifles and 500 rounds of ammunition.
Fasken then marched his brigade to
Jidali hoping to trap the Mullah between himself and the Mijertain tribal
forces to the east, but the Mijertein Sultan Osman Mahmud, who had previously
promised to provide military support against the Mullah, now shied away from
the reality and the Mullah moved into Italian territory. British forces were not allowed to follow
until Italian permission had been obtained and this took around 10 days to
organize. Meanwhile the Mullah was
obtaining resupplies of weapons and ammunition from the Mijertain. To support the British ground troops the
Royal Navy moved an infantry company to seize and garrison the port of Las Khorai; the garrison there was
commanded by Captain P.G. Grant RE who was assisted by Lieutenant W.H. Evans RE,
an intelligence officer who was adept at working with the coastal Somali
chiefs.
Egerton’s last move with his
ground forces was to send Kenna’s mounted infantry after the dervishes, but
rain was about to fall giving the Mullah total freedom of movement through the
use of seasonal water holes that were too numerous for the British to
control. Despite the fact that the
Mullah had problems of his own including the demoralisation of his followers
after Jidballi and losses in his herds during the rushed move north from the
Nogal, Egerton accepted that his own troops and mounts were exhausted and that
it would be impossible to seize or kill the Mullah, so in April he obtained War
Office permission to discontinue the pursuit.
The
British landing at Illig
Dervish prisoners and deserters
stated that the Mullah was heading for Illig, a port in Italian
Somaliland that dervishes were defending. Italian permission and cooperation was
obtained for an amphibious assault to be made on Illig with the aim of seizing
it to deny the port to the Mullah. The
Hampshire Regiment provided 150 officers and men under Major S.C.F. Jackson
DSO, to land alongside the Royal Navy on this operation.
A naval squadron under Rear
Admiral G.L. Atkinson-Willes, Naval Commander in Chief East Indies Station,
left Berbera in mid-April. The ships in
the squadron were the second-class cruisers HMS
Hyacinth (flag-ship) and HMS Fox,
and the third-class cruiser HMS Mohawk. The men of the Hampshire Regiment were
distributed to all three ships along with a small engineer field park under
Captain W.B. Lesslie RE. Captain R.G.
Munn, 36th Sikhs, Indian Army the military staff officer to
Atkinson-Willes, and two intelligence officers, Major F. Cunliffe Owen, RA, and
Lieutenant W.H. Evans RE also joined the squadron, as did a Special Service
Officer of the Somaliland Field Force, Lieutenant G.T. Seabroke, East
Lancashire Regiment.
At 1730 hours on 20th
April Mohawk anchored off the mouth
of the Gallule River that was nearly 6 kilometres miles
west of Illig. Four and a half hours
later Hyacinth and Fox joined Mohawk. Cliffs rose to 45
metres above sea-level here but the dry bed of the Gallule River
offered a route up onto the plateau behind the cliffs. Next morning at 0430 hours Mohawk demonstrated off a beach 800
metres north-west of Illig village to draw dervish attention to that
location. Meanwhile an advance party of
100 seamen and marines from Hyacinth
with one Maxim gun landed in the Gallule river-mouth. Four seamen lost rifles during the
landing. This advance party was
commanded by Captain Honourable H.L.A. Hood RN (Flag Captain). By 0525 hours Hood had secured the area of
plateau above the landing beach without coming into contact with the
enemy. When the sun came up flag communications
were established between the cliff top and the squadron.
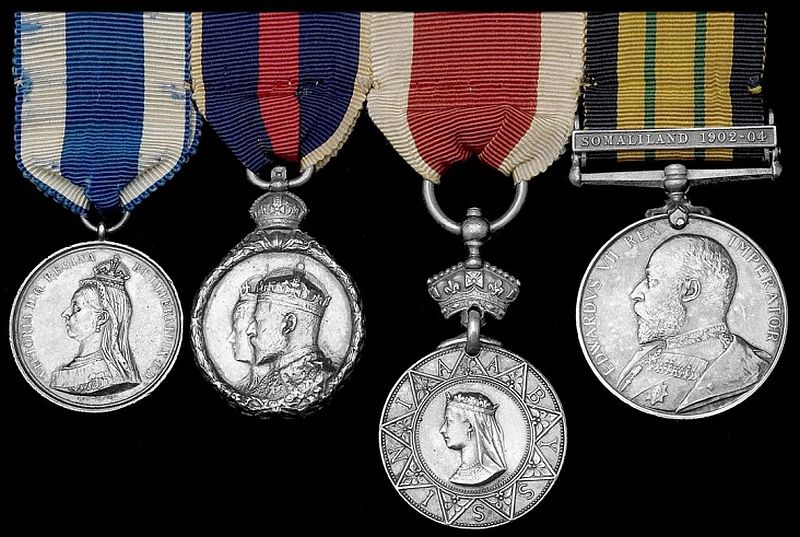
Above: The medals of Rear Admiral G L Atkinson-Willes
More men were landed including
Admiral Atkinson-Willes who took over command of the operation from the
cliff-top. Two hours later when the
landings were complete over 750 officers and men were ashore; surf was high and
all men were wet at least up to the waist and often up to the neck. Major Jackson had 127 of his Hampshires with
him, 94 Royal Marine Light Infantry had been landed under Major C.H. Kennedy,
Royal Marine Light Infantry, and the RN officers and seamen totalled 530. A line about 1300 yards long was formed with
the Hampshires and one Maxim gun on the left, the marines in the centre, and
the seamen and three Maxim guns under Hood on the right. Hood’s task was to envelop the enemy left
flank as well as to attack fortifications he encountered. At about 0740 hours the advance on Illig
began, controlled from the left of the line.
The
attack on the Illig forts
The British troops advanced for an
hour over open ground, the men carrying the Maxims and the ammunition boxes
having to march hard and strenuously in order to keep up. At 0800 hours the Illig cliff-top
fortifications came in sight. Double stone
walls up to 2 metres thick and 3 metres high
protected two stone towers that had three floors of firing slits. The defensive works had been built to allow
dervishes to move from the cliff top to the beach below in concealment from
naval gunfire. On the beach by the
village were a fortification and a loop-holed wall facing the sea, and in the
cliffs there were numerous caves.
On seeing the British troops the
dervishes in the towers blew conch horns and shouted defiance whilst their
womenfolk and children ran to safety further along the cliffs. The seamen enveloped the enemy left flank to
try to cut off an escape route and the Hampshires used depressions in the
plateau to get to within 75 metres of the outer stone wall. As the Hampshires appeared out of the ground
the dervishes fired at them with rifles and an old cannon loaded with
stones. The British line now surged
forward in rushes, the Hampshires getting up to the outer wall. The seamen had more open ground to cover and
they took casualties as they ran forward.
The Maxim gunners provided
effective covering fire that the dervishes could not match; however the three
naval guns soon jammed and the gunners joined in the fight as riflemen. Men scrambled over the two walls or entered
through embrasures, and reached the first fort to find the door firmly
shuttered from the inside. 5334 Lance
Sergeant Thomas Gawn, 1st Battalion The Hampshire Regiment, received
a Distinguished Conduct Medal for
axing down the door whilst under heavy fire from dervishes firing through the
loopholes above. Lance Sergeant Gawn
then entered through the broken door, fought his way up the fort steps and
disarmed three dervishes on the top floor, one of whom had just fatally wounded
a seaman below. 174868 (Gunnery
Instructor) Petty Officer 1st Class John Murphy RN, HMS Hyacinth, was also involved in axing
the door down under heavy fire and he was later awarded a Conspicuous Gallantry Medal.
When they saw that the first fort was lost the dervishes evacuated the
second fort that was 100 metres further along, and a general enemy withdrawal
began down to the caves in the cliffs and along the top of the cliffs.
Major Jackson and his Hampshires
were ordered to hold the two forts whilst the marines and seamen pursued the
retreating enemy. Some of the dervishes
decided to sell their lives dearly and they sniped effectively from caves. Midshipman Arthur Gerald Onslow RN, HMS Hyacinth, received a Conspicuous Service Cross, and 19148
Corporal John Edward Flowers, Royal Marine Light Infantry and HMS Fox, received a Conspicuous Gallantry Medal for gallantry displayed when they
attacked a cave containing three enemy snipers.
The cave was concealed by a hut. Captain Hood led the charge into the
cave, fighting with his sword and revolver whilst Onslow and Flowers used
sword, rifle and bayonet; all three dervishes were killed. Captain Honourable Horace Lambert Alexander
Hood RN was later awarded a Companionship of the Distinguished Service Order.
Meanwhile gunfire from the ships offshore was fired at groups of fleeing
dervishes when that fire did not endanger the British troops ashore. The Italian naval sloop Volturno had now joined the British squadron.
When Illig was secure the
Hampshires were left as a garrison in a temporary fortification on the beach,
along with 50 seamen and marines and the 4 naval Maxims and their crews. The remainder of the naval brigade returned
to their ships. During the night ships’
searchlights played on the cliff tops and ships’ gunners fired at any dervish
movement that was observed. The dead
dervishes found on the battlefield numbered 58, 12 others were found wounded
and several prisoners were taken and 33 rifles seized. Also seized were 3,000 hides sent to Illig by
the Mullah to be used as payment for arms and ammunition, as traders from
French-held Djibouti
ran rifles to Illig in dhows and fishing vessels. In the fight for Illig British casualties
were 3 seamen killed, 3 seamen and 1 marine severely wounded, 2 seamen less
than severely wounded and 5 seamen lightly wounded.
On the following day the dead were
buried 16 kilometres out at sea and large work parties started demolishing the
Illig fortifications. The British
officers at Illig reported their amazement at the strength of the
fortifications there; apparently the Mullah’s chief adviser when building the
strong forts, walls and concealed walkways was a Somali named Haji Sudi, who
had previously been employed as a naval interpreter aboard HMS Ranger. Eleven surf
boats found on the Illig beach were destroyed.
The demolitions were completed by
25th April and Illig was then abandoned as the monsoon swell was
making resupply over the beaches too difficult.
Admiral Atkinson-Willes despatched an intelligence officer in HMS Fox with a letter to Sultan Ali
Yusuf of Obbia, asking him if Illig could be re-populated with the Esa Mahmoud
tribe who had resided there before the Mullah occupied the location. The squadron then sailed to Berbera with
those villagers who had requested asylum.
Fifty other villagers went inland to find relatives, they were given 3
days’ rations; whilst 50 others refused to move from Illig and they were left
there with one week’s rations.
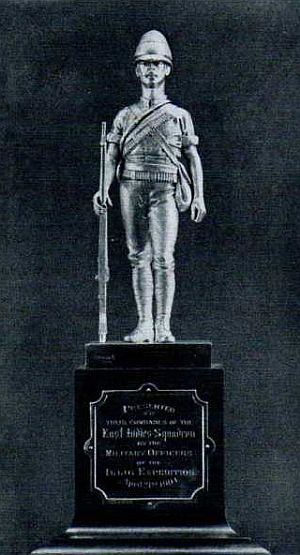
A silver statuette (see above) was later
presented by the military officers of the Illig Expedition to their comrades of
the East Indies Squadron. The statuette
is of a British Army rifleman dressed and equipped for the expedition.
To continue to the final stages of the Campagn and the Awards and Medals please go HERE

 At the commencement of the fight at Jidballi, on 10th
January, 1904, the enemy made a very sudden and determined rush on the 5th
Somali Mounted Infantry, from under cover of bushes close at hand. They weresupported by rifle fire, advanced very rapidly and got
right amongst our men.
At the commencement of the fight at Jidballi, on 10th
January, 1904, the enemy made a very sudden and determined rush on the 5th
Somali Mounted Infantry, from under cover of bushes close at hand. They weresupported by rifle fire, advanced very rapidly and got
right amongst our men.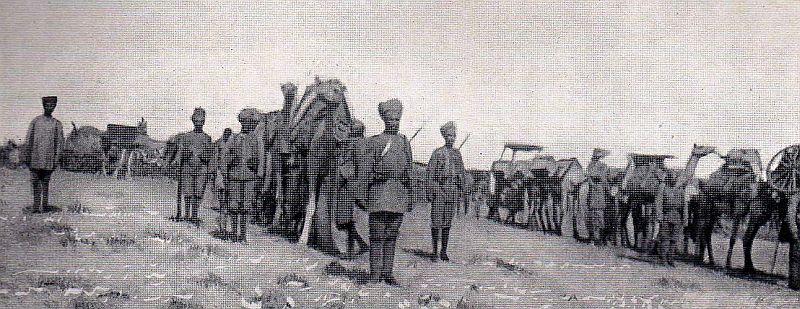
 The Maxim gunners provided
effective covering fire that the dervishes could not match; however the three
naval guns soon jammed and the gunners joined in the fight as riflemen. Men scrambled over the two walls or entered
through embrasures, and reached the first fort to find the door firmly
shuttered from the inside. 5334 Lance
Sergeant Thomas Gawn, 1st Battalion The Hampshire Regiment, received
a Distinguished Conduct Medal for
axing down the door whilst under heavy fire from dervishes firing through the
loopholes above. Lance Sergeant Gawn
then entered through the broken door, fought his way up the fort steps and
disarmed three dervishes on the top floor, one of whom had just fatally wounded
a seaman below. 174868 (Gunnery
Instructor) Petty Officer 1st Class John Murphy RN, HMS Hyacinth, was also involved in axing
the door down under heavy fire and he was later awarded a Conspicuous Gallantry Medal.
When they saw that the first fort was lost the dervishes evacuated the
second fort that was 100 metres further along, and a general enemy withdrawal
began down to the caves in the cliffs and along the top of the cliffs.
The Maxim gunners provided
effective covering fire that the dervishes could not match; however the three
naval guns soon jammed and the gunners joined in the fight as riflemen. Men scrambled over the two walls or entered
through embrasures, and reached the first fort to find the door firmly
shuttered from the inside. 5334 Lance
Sergeant Thomas Gawn, 1st Battalion The Hampshire Regiment, received
a Distinguished Conduct Medal for
axing down the door whilst under heavy fire from dervishes firing through the
loopholes above. Lance Sergeant Gawn
then entered through the broken door, fought his way up the fort steps and
disarmed three dervishes on the top floor, one of whom had just fatally wounded
a seaman below. 174868 (Gunnery
Instructor) Petty Officer 1st Class John Murphy RN, HMS Hyacinth, was also involved in axing
the door down under heavy fire and he was later awarded a Conspicuous Gallantry Medal.
When they saw that the first fort was lost the dervishes evacuated the
second fort that was 100 metres further along, and a general enemy withdrawal
began down to the caves in the cliffs and along the top of the cliffs.